
Table of Contents
Cuisinart Ice Cream Maker Instructions + 3 Foolproof Recipes to Get You Started
Okay, let me paint you a picture: It’s one of those crazy hot summer days where you’re basically melting into your couch, and your kids are doing that thing where they ask for ice cream every five minutes. Instead of dragging everyone to the store (and spending like $20 on a tiny pint), you just waltz over to your kitchen counter where your trusty Cuisinart ice cream maker is chillin’ (literally).
Twenty minutes later? You’ve got homemade vanilla bean ice cream that’ll make you wonder why you ever bought the store-bought stuff. If you’ve been staring at your ice cream maker like it’s some kind of mysterious alien device, don’t worry – we’ve all been there! Today, I’m gonna walk you through these super simple Cuisinart ice cream maker instructions that’ll turn you from a total newbie into the neighborhood ice cream hero.
Getting to Know Your New Best Friend (AKA Your Cuisinart Ice Cream Maker)
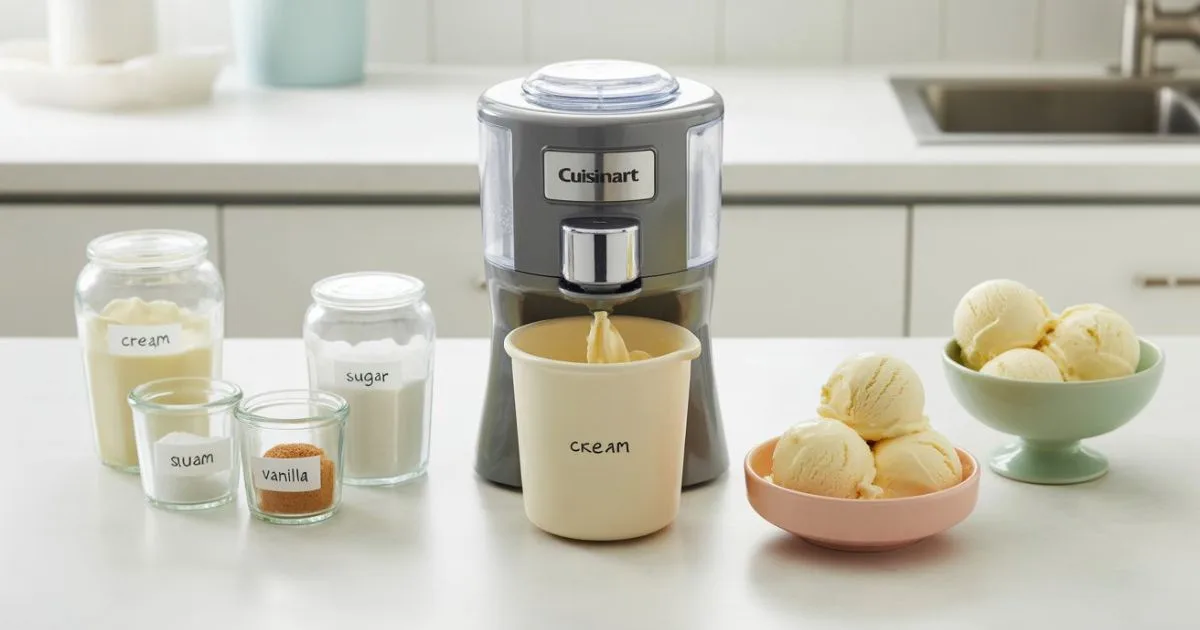
Before we jump into the fun stuff, let’s talk about what you’re working with. Your Cuisinart ice cream maker has three main parts, and honestly, it’s way simpler than it looks. You’ve got the motor base (that’s the part that does all the work), the freezer bowl (this baby is where the magic happens), and the mixing paddle (or as I like to call it, the “stirrer thingy”).
Here’s what’s pretty cool about Cuisinart – they’ve got this double-insulated freezer bowl that keeps everything super cold without you having to mess around with rock salt or bags of ice like it’s 1950. It’s basically the lazy person’s dream come true, and I’m totally here for it.
Quick note: If you want to dive deeper into the technical specs or need the official manual, you can always check out the official Cuisinart ICE-21C instruction booklet for more detailed info. And if you’re more of a visual learner, this helpful video demonstration shows the whole process in action:
Getting Ready: The Prep Work (Don’t Skip This Part!)
The Golden Rule: 24 Hours in the Freezer
Okay, here’s the deal – and this is super important – that freezer bowl needs to hang out in your freezer for at least 24 hours before you can make ice cream. I know, I know, it’s like waiting for Christmas morning, but trust me on this one.
Here’s my little trick to see if it’s ready: give it a gentle shake. If you hear liquid sloshing around in there, it’s not done yet. When it’s properly frozen, it should feel solid and heavy, like you’re holding a bowling ball made of ice cream dreams.
Pro tip from someone who learned the hard way: Just leave that bowl in your freezer all the time. Seriously, find it a permanent home in there. That way, when you get a random craving for homemade ice cream (which happens more often than you’d think), you’re ready to go!
Getting Your Ingredients Ready
Your ice cream mixture should be nice and cold before you start – we’re talking fridge-cold, around 35-40°F. I learned this lesson after making what I lovingly call “ice cream soup” on my first attempt. Cold ingredients = smooth, creamy ice cream. Room temperature ingredients = regret.
And hey, since we’re making ice cream from scratch, don’t cheap out on the ingredients. Good stuff in equals amazing ice cream out – it’s like the golden rule of cooking! If you’re looking for some healthier ice cream options to try with your Cuisinart, check out these healthy homemade ice cream recipes that work perfectly with these instructions.
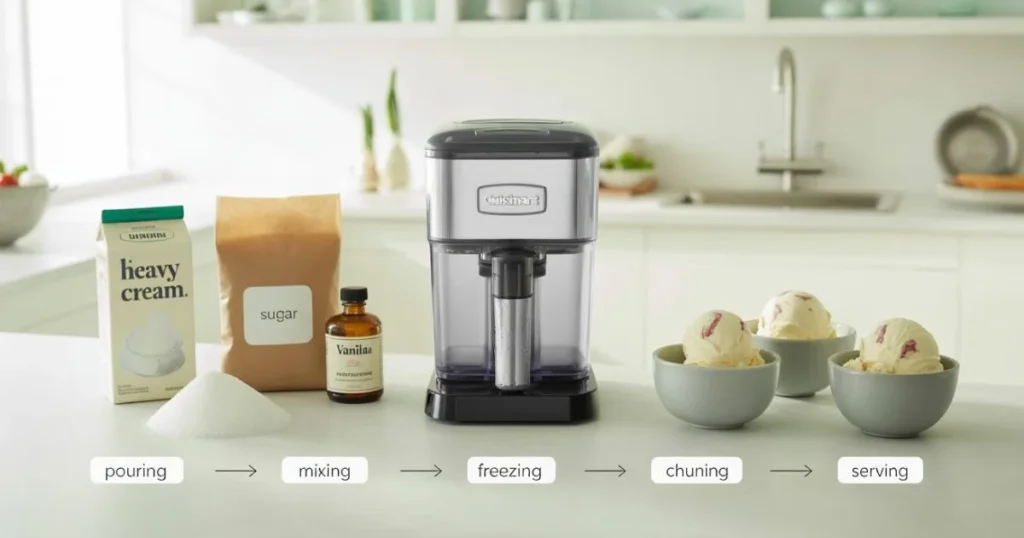
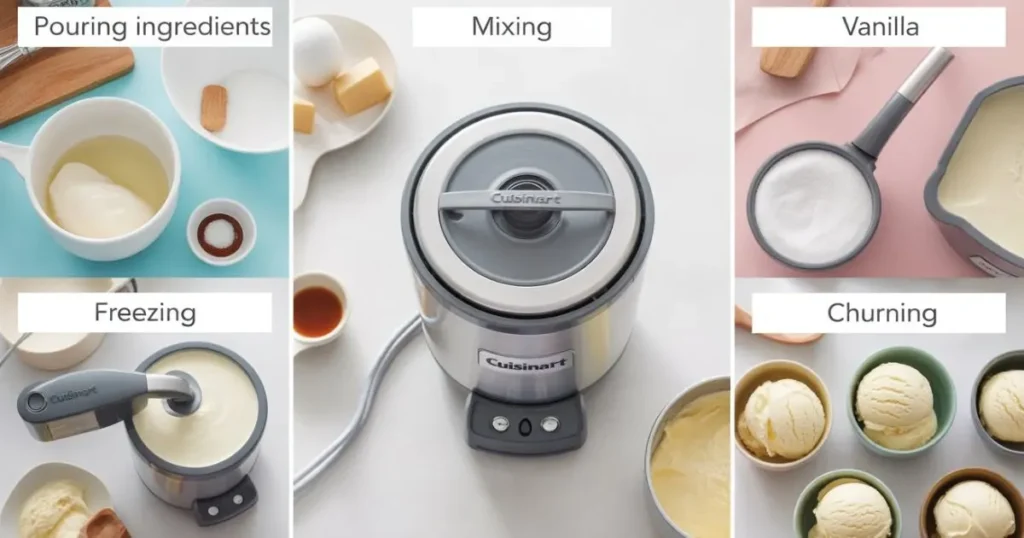
The Step-by-Step Cuisinart Ice Cream Maker Instructions (The Fun Part!)
Step 1 – Grab That Freezer Bowl
Time to get that frozen bowl out of the freezer! But here’s the thing – the clock starts ticking the moment you take it out, so don’t dawdle. Give the outside a quick wipe with a dry towel to get rid of any frost, but don’t touch the inside with your warm hands (learned that one the hard way too).
Pop it onto the motor base and give it a little twist until it clicks into place. You’ll know it’s right when it feels secure and doesn’t wobble around.
Step 2 – Put It All Together
Drop that mixing paddle right into the center of the bowl – it should slide in easily. If you’re fighting with it, take it out and try again. No need to force it and risk breaking something (ask me how I know…).
Next, put the motor housing on top by lining up the arrows and turning clockwise until you hear it lock. It should feel solid, not wobbly like a broken shopping cart wheel.
Step 3 – Pour in the Good Stuff
Here’s where it gets exciting! Pour your chilled ice cream mixture slowly into the bowl. See that max fill line inside? Don’t go over it – I repeat, DO NOT go over it. The mixture expands as it churns, and nobody wants ice cream all over their counter. Been there, cleaned that.
Make sure your mixture is actually cold. If it’s not, stick it back in the fridge for another 30 minutes. Trust me, patience pays off here.
Step 4 – Let the Magic Happen
Hit that power button and let your Cuisinart work its magic! This usually takes about 20-25 minutes, but here’s the thing – don’t be that person who keeps lifting the lid to peek. I know it’s tempting (we’ve all done it), but every time you do, you’re letting cold air escape and messing with the process.
You’ll know it’s done when the mixture looks like soft-serve and the motor starts working a bit harder. It’s like the machine is saying, “Hey, I’m working pretty hard here!”
Step 5 – The Grand Finale
Turn off the machine and remove the top. Your ice cream should look like the perfect soft-serve consistency. If you want it firmer (like scoop-able ice cream), transfer it to a container and stick it in the freezer for a few hours.
Use a plastic spatula to get it out – metal can scratch the bowl, and nobody wants to explain that to their spouse. Work quickly because this stuff melts fast!
3 Recipes That’ll Make You Look Like a Total Pro
Recipe 1 – Classic Vanilla Bean Ice Cream (The Crowd-Pleaser)
This is the ice cream that’ll make your friends think you went to culinary school. It’s creamy, dreamy, and has those cute little vanilla bean specks that scream “I’m fancy homemade ice cream!”
What You’ll Need:
| Ingredient | Amount | My Notes |
|---|---|---|
| Heavy cream | 2 cups | The good stuff from the fridge |
| Whole milk | 1 cup | Don’t even think about using skim |
| Sugar | 3/4 cup | Regular white sugar works great |
| Vanilla bean | 1 whole bean | Or 2 tsp vanilla extract if you’re being practical |
| Egg yolks | 4 large | Room temperature is best |
| Salt | 1/4 teaspoon | It makes the vanilla pop! |
How to Make It:
- Split that vanilla bean lengthwise and scrape out all those tiny seeds into your heavy cream
- Heat the cream and vanilla bean pod until it’s steaming (don’t let it boil – we’re not making scrambled eggs here)
- Whisk those egg yolks and sugar until they’re pale and fluffy, about 3 minutes of good arm workout
- Slowly add the warm cream to the eggs while whisking like your life depends on it (this prevents scrambled egg ice cream, which is not a thing)
- Put everything back on the heat and cook until it coats a spoon – about 170°F if you’re using a thermometer
- Strain it through a fine sieve and chill for at least 4 hours (I usually do this overnight)
- Fish out that vanilla bean pod and follow your Cuisinart ice cream maker instructions for churning
Recipe 2 – Rich Chocolate Fudge Ice Cream (For the Chocolate Obsessed)
If you’re one of those people who thinks chocolate is its own food group, this recipe is for you. It’s rich, decadent, and will cure any bad day you’re having.
What You’ll Need:
| Ingredient | Amount | My Notes |
|---|---|---|
| Heavy cream | 2 cups | The foundation of all good things |
| Whole milk | 1 cup | Cold from the fridge |
| Sugar | 3/4 cup | We’ll split this up |
| Dark chocolate | 6 oz | Go for 70% cacao – life’s too short for cheap chocolate |
| Cocoa powder | 1/3 cup | Unsweetened, and sift it to avoid lumps |
| Egg yolks | 5 large | Room temperature |
| Vanilla extract | 1 teaspoon | Because vanilla makes chocolate taste more chocolatey |
| Salt | 1/2 teaspoon | Balances out all that sweetness |
How to Make It:
- Heat the milk with half the sugar until it’s steaming
- Mix the cocoa powder with the remaining sugar in a separate bowl
- Melt that chocolate in a double boiler, stirring until it’s smooth and gorgeous
- Whisk the egg yolks until they’re smooth
- Slowly add the hot milk to the eggs, whisking constantly (we’re going for custard, not scrambled eggs)
- Stir in the melted chocolate and cocoa mixture
- Cook until it’s thick enough to coat a spoon, then strain and chill for at least 4 hours
- Churn according to your Cuisinart ice cream maker instructions and prepare for chocolate heaven
Recipe 3 – Fresh Strawberry Ice Cream (Summer in a Bowl)
This one’s perfect for when you’ve got amazing strawberries and want to capture summer in frozen form. It’s fresh, fruity, and has actual strawberry pieces – none of that artificial stuff here!
What You’ll Need:
| Ingredient | Amount | My Notes |
|---|---|---|
| Fresh strawberries | 2 cups | The riper, the better |
| Heavy cream | 1 1/2 cups | Cold and creamy |
| Whole milk | 1/2 cup | Cold |
| Sugar | 2/3 cup | We’ll divide this up |
| Lemon juice | 1 tablespoon | Fresh squeezed makes a difference |
| Vanilla extract | 1 teaspoon | Enhances the strawberry flavor |
| Salt | 1/4 teaspoon | Just a pinch |
How to Make It:
- Chop up those strawberries and toss them with 1/3 cup of sugar, then let them sit for 30 minutes (this is called macerating, and it’s fancy)
- Puree about half the strawberries, but leave some chunks because texture is good
- Mix everything else together and whisk until the sugar dissolves
- Fold in your strawberry mixture gently
- Chill for at least 2 hours (patience, grasshopper)
- Churn using your Cuisinart ice cream maker instructions
- In the last 2 minutes, add any reserved strawberry pieces for extra texture

When Things Go Wrong (Because They Sometimes Do)
Help! My Ice Cream Won’t Freeze!
Don’t panic – this happens to the best of us. Usually, it’s one of these culprits:
- Your freezer bowl wasn’t cold enough (guilty as charged on my first attempt)
- Your mixture was too warm when you started
- You got a little too generous with the filling (we’ve all been there)
- Your kitchen is crazy hot and fighting against the freezing process
My Ice Cream Has Weird Texture – What Happened?
Grainy ice cream usually means there were temperature issues during churning or your ingredients didn’t play nice together. Ice crystals happen when things aren’t cold enough to start with.
If your ice cream is too soft, just give it more time in the freezer after churning. Too hard? You might have over-churned it or used too much sugar.
Taking Care of Your Ice Cream Maker (So It Lasts Forever)
After Each Use
Clean everything with warm, soapy water – the bowl, paddle, and lid. Just don’t put the motor base in water (learned that one from a friend who shall remain nameless). Give it a wipe with a damp cloth and call it good.
The freezer bowl is hand-wash only – dishwashers can mess up the internal coolant system, and nobody wants to explain that warranty claim.
Making It Last
Keep that freezer bowl in the freezer when you’re not using it. It keeps the coolant happy and means you’re always ready for spontaneous ice cream making sessions.
Store the motor base somewhere cool and dry, and check the paddle occasionally for cracks or damage.
FAQ: Your Burning Cuisinart Ice Cream Maker Questions
How long does that bowl really need to be in the freezer? A full 24 hours, minimum. I know it feels like forever, but it’s worth the wait. The shake test is your friend – no sloshing sounds allowed!
Can I make back-to-back batches? Nope, sorry! After one batch, that bowl needs another 24-hour freeze cycle. Plan ahead if you’re making multiple flavors.
How much mixture can I actually put in there? Don’t go over the max fill line – usually about 1.5 quarts. The mixture expands, and overflow is not fun to clean up.
How do I know when it’s done churning? When it looks like soft-serve and the motor starts working harder, you’re good to go. Usually takes 20-25 minutes.
What if I let it churn too long? You’ll end up with butter-textured ice cream, which is not the goal. Stop when it reaches the right consistency.
My machine stopped working – now what? Check that everything’s assembled correctly and the bowl is properly frozen. If it’s still acting up, time to call Cuisinart customer service.
Wrapping It Up
Look, mastering these Cuisinart ice cream maker instructions is going to change your summer game completely. You’ll save money, impress your friends, and never have to settle for store-bought ice cream again (unless you want to, no judgment here).
Start with that vanilla recipe – it’s foolproof and will give you confidence. Then go crazy with the chocolate fudge or strawberry. Before you know it, you’ll be experimenting with your own crazy flavor combinations and becoming the person everyone wants to visit in the summer.
So what are you waiting for? Dust off that Cuisinart, pick a recipe, and start churning your way to frozen perfection. Your taste buds (and your wallet) will thank you, and you’ll wonder why you waited so long to become an ice cream making rockstar with these simple Cuisinart ice cream maker instructions!
Have You Given This Recipe A Try?
There are no reviews yet. Be the first one to write one.