
Table of Contents
You know that moment before your Halloween guests arrive—the lights are dimmed, pumpkins flicker, and candy bowls overflow with sugar?
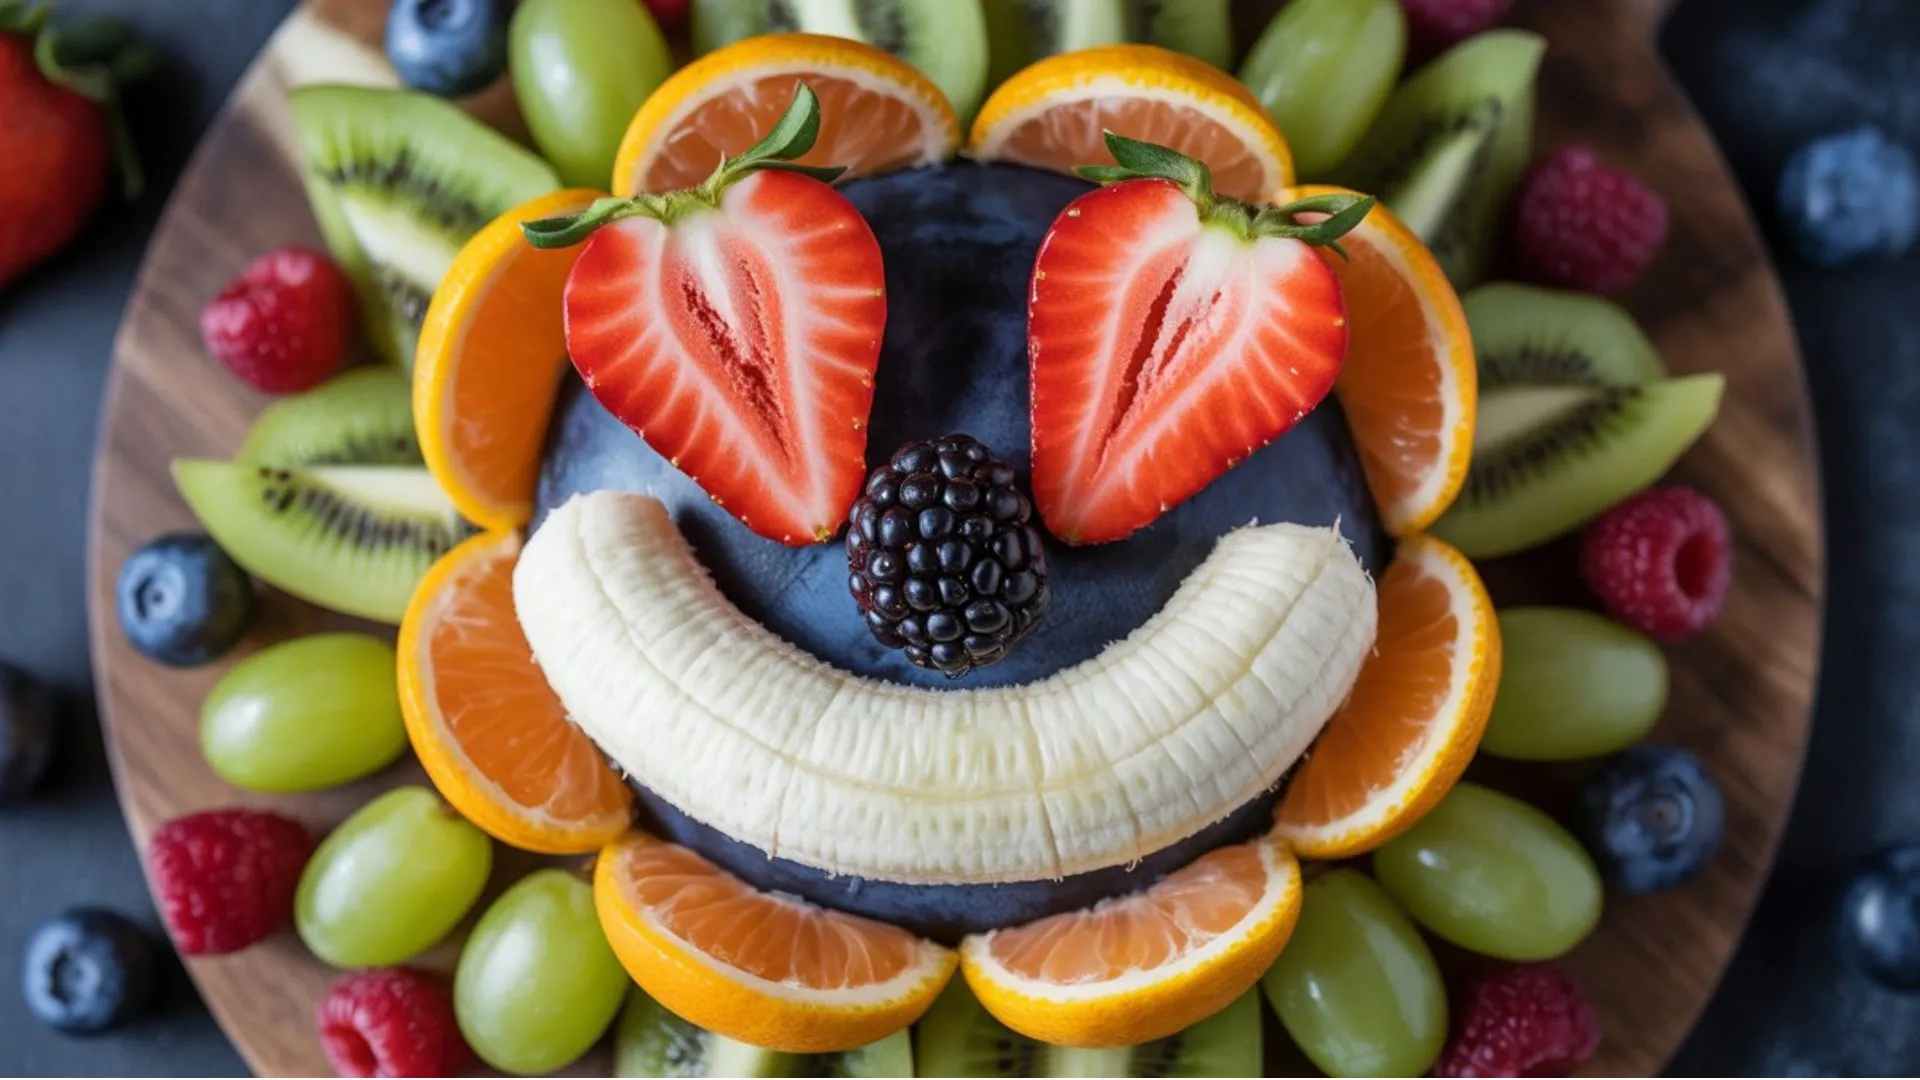
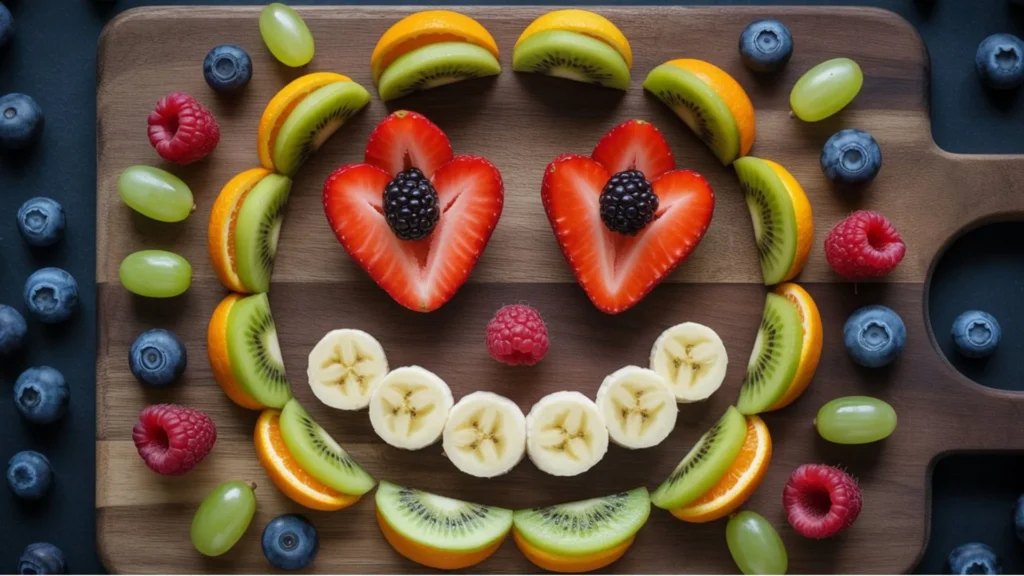
Now imagine this: right in the center of the table, a halloween fruit tray bursting with color—glowing orange slices, ghostly bananas, and juicy strawberries shaped like little monsters. It’s healthy, eye-catching, and absolutely party-perfect.
If you’re tired of the same candy overload every October, this guide will show you exactly how to craft a halloween fruit tray that’s as delicious as it is delightful. With five simple steps, a few clever presentation tricks, and some optional dips, you’ll turn your kitchen into a Halloween hit.
Whether you’re hosting a kids’ party, a neighborhood gathering, or just want a creative treat for your family, this tray checks all the boxes—fun, easy, and healthy.
Why a Halloween Fruit Tray Belongs at Every Party
Halloween doesn’t have to mean processed sugar and candy crashes. A halloween fruit tray gives you the best of both worlds—spooky charm and real nutrition. Fruits are naturally vibrant, and when you carve or cut them into fun shapes, they steal the show.
Here’s why your table needs one this year:
- Healthy Balance: With antioxidants, vitamins, and fiber, fruit trays keep your guests energized—not sluggish.
- Kid-Friendly: Kids love hands-on snacks they can recognize (and parents appreciate something besides candy).
- Budget-Friendly: Seasonal fruits like oranges and apples are inexpensive and plentiful in October.
- Visually Stunning: The colors of fall—orange, red, green, purple—come alive naturally in fruit.
- Make-Ahead Friendly: You can prep your tray hours before the party without worrying about freshness.
Want to add more balance to your party menu? Check out this roundup of easy Halloween snacks for kids —they pair perfectly with your fruit tray for a complete festive spread.
Gather Your Essentials Before You Start
Before you dive into decorating, let’s talk tools and ingredients. Having everything ready makes the process smoother and more enjoyable.
What You’ll Need
Equipment:
- Large serving board or platter (black or wooden for Halloween aesthetic)
- Paring knife and small cookie cutters (pumpkin, bat, ghost shapes)
- Small serving bowls for dips
- Paper towels (for drying fruit)
- Optional: toothpicks, themed napkins, small plastic spiders for decoration
Fruits (choose 5–7 varieties for visual diversity):
- Oranges or clementines (mini pumpkins)
- Bananas (perfect for ghosts)
- Strawberries (great for “bloody” bites)
- Kiwi slices (for a green pop)
- Red and green grapes (easy to arrange)
- Blackberries or blueberries (dark spooky tones)
- Pineapple or cantaloupe (for shape cutting)
- Apples (for classic sweetness)
Step 1: Choose Your Spooky Theme
Every halloween fruit tray starts with an idea.
Do you want a haunted forest, monster mash, or pumpkin patch vibe?
The theme influences your color palette, props, and arrangement.
- Haunted Forest: Use darker fruits like blackberries, blueberries, and grapes with a black or dark wooden tray. Add a few fake spiderwebs for effect.
- Pumpkin Patch: Stick to oranges, mangoes, and clementines. Add mint leaves to mimic pumpkin stems.
- Monster Mash: Combine all bright fruits for a chaotic, colorful effect with eyeball candies or chocolate chips as eyes.
Pro Tip:
Keep a small bowl of lime or lemon juice handy. Dipping apple and banana slices for a few seconds helps prevent browning—keeping your tray photo-ready.
Step 2: Wash, Peel & Slice the Fruits
Freshness is everything. Start by washing all your fruits under cool running water. Pat them completely dry before slicing—moisture causes fruit to slide and makes the tray look messy.
Here’s how to prepare each fruit for best texture and shape:
- Bananas: Cut in half, then press two mini chocolate chips into each for eyes—instant ghosts!
- Oranges or Clementines: Peel but keep whole. Draw little jack-o’-lantern faces with edible marker if you’d like.
- Strawberries: Slice the top off and dip halfway into melted chocolate for “monster hats.”
- Melons or Pineapples: Use cookie cutters to create bats, pumpkins, or skull shapes.
- Grapes & Blueberries: Keep them whole—great fillers for color contrast.
Nutritional Tip:
A serving of mixed fruit (about one cup) contains roughly 80–100 calories, packed with Vitamin C, potassium, and antioxidants that boost immunity—perfect for cold-weather season.
Step 3: Assemble with Color & Balance
This is where the fun begins—you’re designing edible art.
Start with your largest fruit pieces in the center (melons, pineapple, oranges). Then, layer in smaller ones—grapes, berries, kiwi slices—to create a natural gradient of color. You’re essentially painting with fruit.
Think contrast:
- Orange beside green (clementine next to kiwi)
- Red near black (strawberries beside blueberries)
- Light fruits at the top, dark ones near the edges
Use small bowls of dip to anchor the layout. It’s visually appealing and gives guests easy access.
Visual Trick:
Alternate textures. Soft fruits like strawberries pop beautifully against firm ones like grapes. Sprinkle in mint leaves for a fresh, Halloween-garden vibe.
Step 4: Add a Sweet (or Spooky) Dip
No halloween fruit tray is complete without a dip—or two! These dips not only complement the fruit but add richness and texture contrast.
Yogurt Ghost Dip
Description: Light, creamy, and tangy—perfect for bananas or berries.
- Ingredients:
- 1 cup plain Greek yogurt
- 1 tablespoon honey
- ½ teaspoon vanilla extract
- Instructions:
- Whisk all ingredients until smooth.
- Spoon into a bowl and chill for 10 minutes.
- Add a swirl of chocolate syrup on top for a ghostly pattern.
Nutrition (per 2 tbsp): ~35 calories, 3g protein, 0g fat, 5g carbs
Chocolate Spider Web Dip
Description: Rich and dramatic—pairs beautifully with strawberries and orange slices.
- Ingredients:
- ½ cup dark chocolate chips
- 1 tablespoon butter
- 2 tablespoons milk
- Instructions:
- Melt chocolate and butter in a small saucepan over low heat.
- Stir in milk until glossy.
- Pour into a shallow bowl and use a toothpick to draw a spider web with white chocolate or yogurt drizzle.
Nutrition (per 2 tbsp): ~70 calories, 3g fat, 6g carbs
Caramel Apple Drizzle (Optional)
For a nostalgic flavor twist, melt 2 tablespoons of caramel bits with 1 teaspoon milk and drizzle lightly over apples or pears. It adds Halloween fair vibes without overwhelming sweetness.
Pro Tip: If you’re serving outdoors, keep dips chilled by placing bowls over ice packs beneath the tray.
Step 5: Garnish & Serve Like a Pro
Now it’s time to add those little details that make your tray magical.
- Add Texture: Sprinkle shredded coconut “spider webs” or pomegranate “blood drops.”
- Edible Eyes: Use candy eyes on strawberries or kiwi slices.
- Spooky Props: Place small toy skeleton hands or fake cobwebs around the platter (just avoid contact with food).
- Lighting Tip: A flickering tea light near your tray enhances colors and atmosphere—great for night parties.
For creative inspiration on artistic layouts, check out this stunning Halloween fruit platter—it’s full of design ideas for vibrant color combinations and fun seasonal twists.
Refrigerate the tray for at least 15 minutes before serving. This keeps the fruit crisp and refreshing.
3 Bonus Halloween Fruit Tray Ideas to Try
If you’re feeling extra creative (or hosting multiple events), here are three quick spin-offs that use the same concept in fun new ways.
1. Ghostly Banana Pops
- Cut bananas in half, stick in popsicle sticks, dip in Greek yogurt, and freeze.
- Add chocolate chip eyes before freezing.
- Serve on a black plate for contrast.
Nutrition: ~90 calories each, 0g fat, 20g carbs, 2g protein.
2. Watermelon Monster Bowl
- Carve a large watermelon like a jack-o’-lantern.
- Scoop out the inside and fill it with mixed fruit—grapes, pineapple, and berries “spilling out” like monster guts.
Nutrition: About 80 calories per cup, full of hydration and Vitamin C.
3. Candy Corn Fruit Cups
- Layer pineapple chunks, mandarin orange slices, and whipped cream or yogurt in clear cups to mimic candy corn.
Nutrition: ~120 calories each, low-fat, kid-approved.
Presentation Tips for Maximum Wow Factor
- Color Grouping: Arrange fruits in mini color clusters (orange corner, green corner, red center) for Instagram-worthy contrast.
- Layering: Stack taller fruits in the back and flatter ones upfront to create depth.
- Props: Small pumpkins, fake bats, or cobweb lace table runners amplify the Halloween vibe.
- Lighting: Use warm string lights or candles to make your fruit glisten.
Storage Tip:
Cover your tray with plastic wrap and refrigerate for up to 8 hours. To revive shine, lightly mist fruit with lemon water before serving.
Avoid These Common Fruit Tray Mistakes
Even seasoned hosts make a few blunders. Here’s how to dodge them:
- Skipping the Drying Step: Wet fruit slides and ruins presentation.
- Overcrowding: Leave small gaps—it makes your tray look abundant, not chaotic.
- Ignoring Color Balance: Too many similar tones (like all orange) flatten the visual impact.
- Serving Too Early: Assemble a few hours before, not overnight, for peak freshness.
- Forgetting the Dip: A creamy or chocolatey accent makes fruit irresistible.
Nutrition Insights: The Smarter Halloween Choice
Choosing a halloween fruit tray over candy isn’t just a visual upgrade—it’s a nutritional one.
| Fruit | Calories (1 cup) | Key Nutrients |
|---|---|---|
| Strawberries | 50 | Vitamin C, Fiber |
| Grapes | 100 | Antioxidants |
| Oranges | 80 | Vitamin A & C |
| Kiwi | 90 | Potassium |
| Pineapple | 82 | Manganese, Vitamin C |
| Bananas | 105 | Vitamin B6, Energy Boost |
When you balance your tray with a mix of fiber, natural sugar, and hydration, your guests enjoy a guilt-free snack that supports wellness. Pair with low-sugar dips and you’ve got a smart, festive alternative to candy bowls.

FAQs About Halloween Fruit Trays
Q1: How far in advance can I make a halloween fruit tray?
You can prep up to 8 hours ahead. Cover tightly with plastic wrap and refrigerate. Add bananas or delicate fruits right before serving.
Q2: What fruits last longest on a halloween fruit tray?
Grapes, oranges, melon, and pineapple hold their shape and moisture best. Avoid overly juicy fruits like watermelon if you’re prepping early.
Q3: How can I make a halloween fruit tray look fuller?
Layer fruits in small mounds and fill gaps with berries or mint leaves. Visual depth makes your tray look abundant.
Q4: Can I make a halloween fruit tray for kids’ lunchboxes?
Absolutely! Pack smaller portions in divided containers and include a mini yogurt dip. Add stickers or spooky toothpicks for fun.
Q5: How do I keep cut fruit from turning brown?
Brush apple and banana slices with a light coat of lemon juice. It won’t affect taste but keeps them vibrant.
Bringing It All Together
Creating a halloween fruit tray is about more than serving food—it’s about crafting an experience. When your guests see those ghostly bananas, pumpkin-like oranges, and colorful monster bites, they’ll light up. You’re not just feeding them—you’re delighting them.
And the best part? You did it all with real ingredients. No artificial colors, no sugar crash—just wholesome fruit made festive.
So, clear a little counter space, grab your favorite fruits, and start slicing. With these five easy steps, your Halloween table will be the talk of the night.
Now it’s your turn—make your own halloween fruit tray, snap a photo, and tag your spooky creation. Your kitchen’s about to become the sweetest (and healthiest) haunted spot in town. 🎃🍓👻
Have You Given This Recipe A Try?
There are no reviews yet. Be the first one to write one.