
Table of Contents
Chicken Steak and Cheese: Introduction
Oh boy, do I have a story for you! Picture this: It’s Tuesday night, you’re absolutely starving after work, and all you want is that perfect chicken steak and cheese sandwich. You know the one – tender, juicy chicken with gooey melted cheese that makes your taste buds do a happy dance. So there I was, ingredients spread across my counter like I’m about to perform some culinary magic trick.
Fast forward 20 minutes, and I’m staring at what can only be described as a sandwich disaster. The chicken was drier than my sense of humor, the cheese had turned into some weird rubbery blob, and don’t even get me started on the soggy bread situation. I literally wanted to cry into my failed dinner.
But here’s the thing – I didn’t give up (because I’m stubborn like that), and after way too many kitchen fails and a few choice words, I figured out exactly what was going wrong. Turns out, there are eight sneaky little mistakes that can turn your dream chicken steak and cheese into a total nightmare. And guess what? I’m gonna spill all the tea so you don’t have to go through the same kitchen heartbreak I did.
Let’s Talk About What Makes Chicken Steak and Cheese Actually Amazing
Why This Sandwich Hits Different
Look, I’m not gonna lie – there’s something magical about a perfectly made chicken steak and cheese sandwich. It’s like the comfort food gods decided to bless us with this incredible combo of protein, melty cheese, and carbs. Pure genius, really.
The thing is, most people think it’s just about throwing chicken and cheese on bread. Nope! It’s actually about understanding how these ingredients work together. And here’s a little secret I learned the hard way: technique beats fancy ingredients every single time. You can use the most expensive organic chicken breast, but if you mess up the cooking, you’re still gonna end up with a sad sandwich.
The Science-y Stuff (But Don’t Worry, I’ll Keep It Simple)
Okay, I promise I won’t get too nerdy here, but there’s some cool stuff happening when you cook chicken. Basically, the proteins start changing at around 140°F, and if you nail the temperature game, you get that perfect tender texture we’re all after.
Same deal with cheese – different types melt at different temps, which is why some cheese gets all stringy and weird while others stay smooth and creamy. And bread? Well, that’s just trying not to turn into a soggy mess, bless its heart.
The 8 Epic Fails That’ll Ruin Your Chicken Steak and Cheese (And How to Fix ‘Em)
Mistake #1 – Picking the Wrong Chicken (This One’s a Biggie!)
Alright, let’s start with the chicken situation. I used to be that person who automatically grabbed chicken breast because, you know, it’s supposed to be the “healthy” choice. Big mistake! Chicken breast is like that friend who looks good on paper but is actually kinda boring.
Here’s the deal: chicken thighs are where it’s at for chicken steak and cheese. They’ve got more fat (which equals more flavor and juiciness), and they’re way more forgiving if you accidentally overcook them a bit. Plus, they’re usually cheaper – win-win! If you’re looking for more inspiration, check out these amazing chicken recipes that’ll give you tons of ideas.
When you’re prepping your chicken, you wanna pound it to about 1/2-inch thickness. I know it sounds violent, but trust me, it helps everything cook evenly. No more thick parts that are still raw while the edges are overcooked. And if you’re dealing with leftover chicken and need to know how to shred chicken properly, that’s a whole different skill that comes in handy for other recipes too.

My Go-To Chicken Prep Method
What you need:
| Ingredient | Amount | Why This Matters |
|---|---|---|
| Chicken thighs (boneless, skinless) | 1 lb | The star of the show |
| Olive oil | 2 tbsp | For that golden sear |
| Salt | 1 tsp | Flavor city |
| Black pepper | 1/2 tsp | A little kick |
| Garlic powder | 1/2 tsp | Because garlic makes everything better |
Here’s what you do:
- Pat that chicken dry – I’m talking bone dry! Wet chicken = no sear
- Grab your meat mallet and pound to 1/2-inch thickness (great stress relief, by the way)
- Season generously – don’t be shy!
- Let it sit for 15 minutes (patience, grasshopper)
- Heat your pan to medium-high with oil
- Cook 4-5 minutes per side until it’s golden and gorgeous
- Check with a thermometer – 165°F is your magic number
Mistake #2 – Turning Your Chicken Into Shoe Leather
Oh man, I’ve been there. You get distracted by your phone, or you’re chatting with someone, and BAM – your chicken has turned into something you could use to resole your boots. Not fun.
The key is watching your temps like a hawk. Once your chicken hits 165°F, it’s done. No ifs, ands, or buts about it. Any higher and you’re entering the danger zone of dry, chewy chicken.
Here’s a pro tip: your chicken should feel springy when you press it, not hard. And if you see clear juices running out, that’s your cue that it’s ready to come off the heat. Don’t be that person who cuts into it to check – you’ll lose all those precious juices!
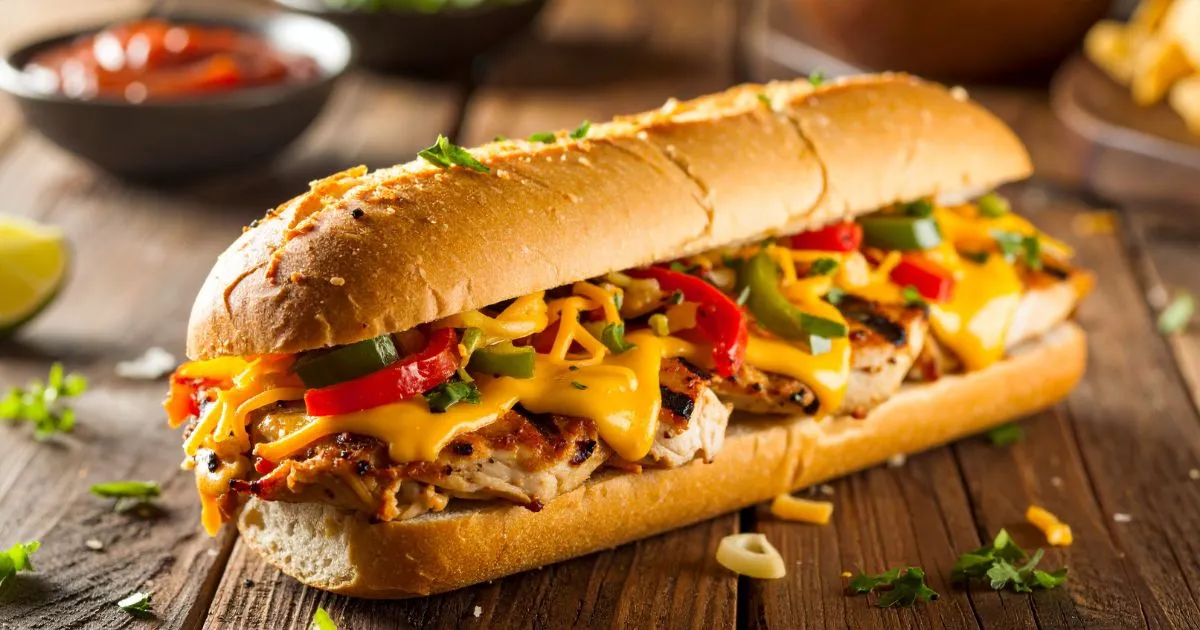
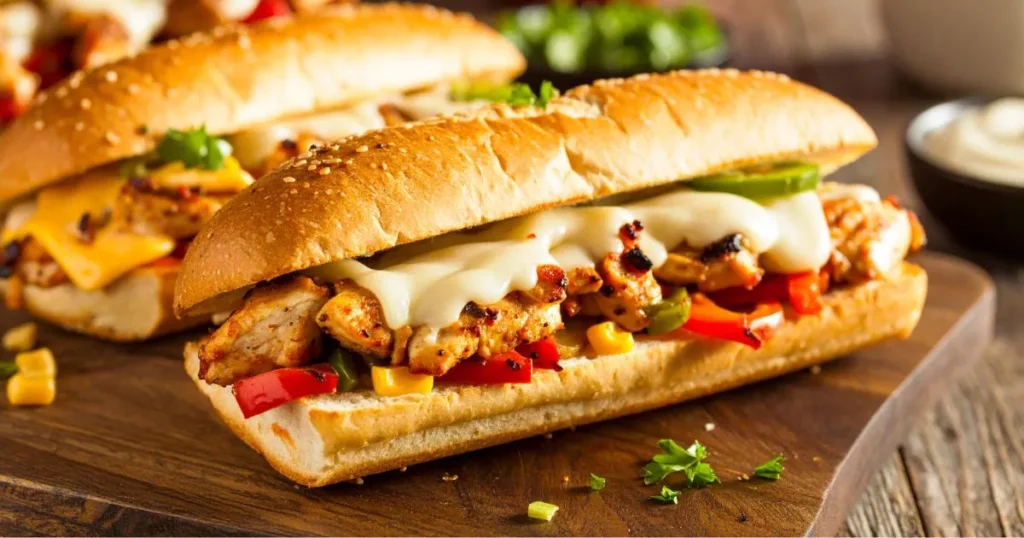
Mistake #3 – Cheese Chaos (The Struggle is Real)
Can we talk about cheese for a hot minute? Because this is where things get interesting. I used to just grab whatever cheese was on sale and call it a day. Then I wondered why my cheese looked like it had been through a blender.
Here’s the thing: not all cheese is created equal when it comes to melting. Sharp cheddar tastes amazing but can be a diva when it comes to melting smoothly. Monterey Jack melts like a dream but can be a bit bland on its own. The solution? Team them up!
I learned this trick from watching way too many cooking shows during lockdown, and it’s a game-changer. You combine different cheeses to get both flavor and that perfect melty texture. Speaking of watching cooking videos, I found this amazing tutorial that shows the whole process step-by-step – totally worth checking out if you’re a visual learner like me!
The Cheese Blend That’ll Change Your Life
What you need:
| Ingredient | Amount | What It Does |
|---|---|---|
| Sharp cheddar (shredded) | 1 cup | Brings the flavor |
| Monterey Jack (shredded) | 1/2 cup | Melts like butter |
| Cream cheese | 2 oz | Makes it extra creamy |
| Milk | 2 tbsp | Keeps it smooth |
| Paprika | Just a pinch | Pretty color |
The magic happens like this:
- Let everything come to room temp first (cold cheese is stubborn)
- Warm the milk in a small pan – low heat, don’t rush it
- Add the cream cheese and whisk until it’s smooth
- Slowly add the shredded cheese, stirring constantly
- Take it off the heat as soon as it’s melted
- Add that paprika for some color
- Use it right away while it’s still warm and gorgeous
Mistake #4 – Bread Betrayal (When Your Foundation Fails)
Let’s be real – bread is the foundation of your sandwich, and if you mess this up, everything else falls apart. Literally. I’ve made sandwiches that collapsed faster than my motivation on Monday morning.
You want bread that can handle the job. Think sturdy but not so crusty that it cuts up your mouth. Here are my favorites:
- Hoagie rolls (classic choice, never lets you down)
- Ciabatta (fancy but worth it)
- Sourdough (tangy and delicious)
- Kaiser rolls (sturdy little soldiers)
And please, for the love of all that is holy, toast your bread! I don’t care if you’re in a rush. Toasted bread creates a barrier that keeps everything from turning into a soggy mess. Nobody wants a soggy sandwich – that’s just sad.
Mistake #5 – Seasoning Sins (Bland Food is a Crime)
This one makes me want to shake people sometimes. You’ve got this beautiful chicken, and you barely season it? That’s like buying a sports car and driving it in first gear – what’s the point?
Here’s what I learned: season early and season well. Salt your chicken about 30 minutes before cooking. This isn’t just about flavor – it actually helps the chicken hold onto moisture better. It’s like giving your chicken a little spa treatment.
Don’t be scared of seasonings either. Life’s too short for bland food!
My Secret Seasoning Mix (Seriously, It’s Magic)
The lineup:
| Ingredient | Amount | What It Brings |
|---|---|---|
| Paprika | 2 tbsp | Smoky goodness |
| Garlic powder | 1 tbsp | Because garlic is life |
| Onion powder | 1 tbsp | Sweet and savory |
| Dried oregano | 1 tsp | Herby freshness |
| Black pepper | 1 tsp | A little heat |
| Salt | 1 tsp | The foundation |
| Cayenne pepper | 1/4 tsp | Optional kick |
Mix it up:
- Throw everything in a bowl and whisk it together
- Store in an airtight container (it keeps for months)
- Use about 1 tablespoon per pound of chicken
- Rub it in like you mean it
- Let it sit for 30 minutes before cooking
Mistake #6 – Temperature Tantrums (Hot and Cold Drama)
Temperature control is like the behind-the-scenes MVP of cooking. You can’t see it doing its job, but when it’s wrong, everything falls apart. I used to be all over the place with my heat settings – high, low, medium, back to high. My poor chicken didn’t know what hit it!
Here’s what works: get your pan to medium-high heat before you add the chicken. You want that satisfying sizzle when it hits the pan. That’s the sound of the Maillard reaction happening – basically, flavor being born.
Once you add the chicken, resist the urge to mess with the temperature constantly. Pick a heat level and stick with it. Your chicken will thank you with even cooking and better texture.
Mistake #7 – Assembly Anarchy (Order Matters, People!)
I used to just pile everything on bread and hope for the best. Spoiler alert: that doesn’t work. There’s actually a method to the madness when it comes to building your sandwich.
The secret is working with temperatures. Hot stuff goes on hot stuff, and you build from the bottom up with purpose. It’s like sandwich architecture – every layer has a job to do.
How to Build a Sandwich Like a Pro
The game plan:
| Layer | What Goes Here | Why This Order |
|---|---|---|
| Bottom bread | Toasted and warm | Your foundation |
| First cheese layer | Melted and smooth | Creates a moisture barrier |
| Chicken | Hot and sliced | The main event |
| More cheese | Melted on top | Because cheese is life |
| Veggies | Room temp | Adds crunch and freshness |
| Top bread | Warm and toasted | Seals the deal |
Step by step:
- Toast your bread until it’s golden (no shortcuts!)
- Immediately add a thin layer of cheese to the bottom
- Add your hot chicken while the cheese is still melty
- Top with more cheese (don’t be stingy)
- Add any veggies you want
- Crown it with the top bread
- Give it a gentle press and dive in immediately
Mistake #8 – Storage Struggles (Leftovers Don’t Have to Suck)
Let’s be honest – sometimes you make too much, or life happens and you can’t finish your sandwich right away. I used to just wrap the whole thing in foil and hope for the best. That’s a recipe for disappointment.
The trick is storing components separately when possible. Chicken in one container, cheese in another, bread wrapped up on its own. It’s a little extra work, but your future self will thank you when you’re not eating soggy, weird-textured leftovers.
If you absolutely have to store an assembled sandwich, wrap it in paper towels first, then foil. The paper towels absorb excess moisture, and the foil keeps it from drying out completely.
Pro Tips That’ll Make You Look Like a Kitchen Genius
Level Up Your Game
Want to really impress people? Here are some tricks I’ve picked up:
Flavor layering is where it’s at. Don’t just season once and call it good. Season your chicken, season your cheese sauce, even season your bread if you’re feeling fancy. Each layer adds depth.
Presentation matters too. Cut your sandwich at an angle (trust me, it tastes better that way), maybe add a pickle on the side, and serve it on a plate that doesn’t look like it came from a college dorm room.
Mix It Up With These Variations
Once you’ve mastered the basics, try these fun twists:
- Philly style: Add sautéed peppers and onions (so good!)
- Buffalo version: Mix some hot sauce into your cheese blend
- BBQ style: Brush your chicken with BBQ sauce before cooking
- Mediterranean: Add some herbs and maybe some feta cheese
Tools That Actually Make a Difference
You don’t need a fancy kitchen, but a few good tools help:
- A heavy-bottomed pan for even heat (cast iron is perfect)
- An instant-read thermometer (takes the guesswork out)
- A decent knife for slicing (dull knives are dangerous and annoying)
When Things Go Wrong (Because They Will)
Quick Fixes for Common Disasters
Chicken turned out dry?
- Next time, use thighs instead of breasts
- Lower your heat and cook longer
- Don’t skip the thermometer
Sandwich is greasy?
- Drain your chicken on paper towels
- Use less oil when cooking
- Choose better bread that can handle the moisture
Everything tastes bland?
- Season way earlier in the process
- Don’t be afraid of salt and spices
- Add aromatics like garlic and onions
Bread got soggy?
- Always toast your bread first
- Eat it right away (I know, revolutionary advice)
- Store wet and dry ingredients separately
The Bottom Line
Look, making a great chicken steak and cheese sandwich isn’t rocket science, but it’s also not just throwing ingredients together and hoping for the best. It’s about understanding what makes each component work and how they all play together.
The best part? Once you get the hang of these basics, you can get creative and make it your own. Add different seasonings, try new cheese combinations, experiment with different breads. The world is your oyster – or in this case, your chicken steak and cheese sandwich.
Don’t get discouraged if your first few attempts aren’t perfect. I’ve made more terrible sandwiches than I care to admit, but each one taught me something. Now I can make a chicken steak and cheese sandwich that would make a deli jealous, and you can too.
So grab your ingredients, fire up that pan, and show that sandwich who’s boss. Your taste buds (and your family) will thank you for it! And if you want to see how the pros do it, definitely check out this incredible chicken cheesesteak recipe that’ll blow your mind.
Your Burning Questions Answered
Q: Seriously, why are chicken thighs better than breasts for chicken steak and cheese? A: Thighs have more fat, which means more flavor and they stay juicy even if you overcook them a little. Breasts are lean, which sounds healthy but can turn into cardboard if you’re not careful.
Q: Help! My cheese always gets stringy and weird. What am I doing wrong? A: You’re probably using too much heat or the wrong type of cheese. Try mixing sharp cheddar with Monterey Jack, and melt it slowly over low heat. Patience is key!
Q: Can I prep everything ahead of time for busy weeknights? A: Absolutely! Season your chicken and store it in the fridge for up to a day. Make your cheese blend and keep it separate. Just don’t assemble until you’re ready to eat.
Q: What’s the magic temperature for cooking chicken steak? A: 165°F internal temp is your safety zone. Use medium-high heat to get a good sear, then adjust as needed. And please, use a thermometer – guessing is for amateurs!
Q: How do I keep my sandwich from turning into a soggy mess? A: Toast your bread like your life depends on it, drain excess oil from your chicken, and eat it right away. Don’t let it sit around getting sad and soggy.
Q: What’s the real secret to restaurant-quality results at home? A: Get everything prepped before you start cooking (fancy chefs call this “mise en place”). Having everything ready lets you work fast and keep temperatures where they need to be.
Ready to become the chicken steak and cheese champion of your kitchen? Try these tips and let me know how it goes! I’d love to hear about your sandwich victories in the comments below!
Have You Given This Recipe A Try?
There are no reviews yet. Be the first one to write one.